Pair these delicious and impossibly soft flour tortillas with my DIY taco seasoning and see how delicious taco night can really be!


how to cook flour tortillas
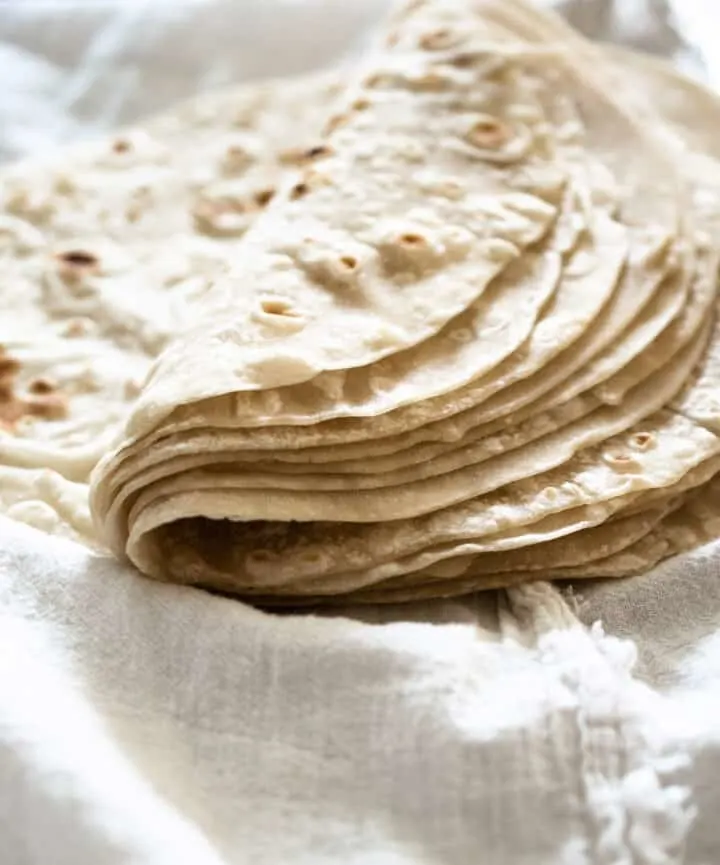
Homemade flour tortillas are absolute heaven. When cooking them, you want to find that sweet spot between slightly under done to fully cooked. It is best to stop when the tortillas are just dotted with brown marks, but still have a slight translucence to the centers. It can be mistaken as underdone in the center, but really its just the oil coming out from the heat, and once you remove it from the pan, the center sets up and they are perfectly soft. It takes great restraint to not just snack on one right then and there.
Going beyond this point can make the tortillas dry, and tough. It's better to aim for slightly underdone than overdone, as they will set as they cool and be the most flexible, soft flour tortillas ever.

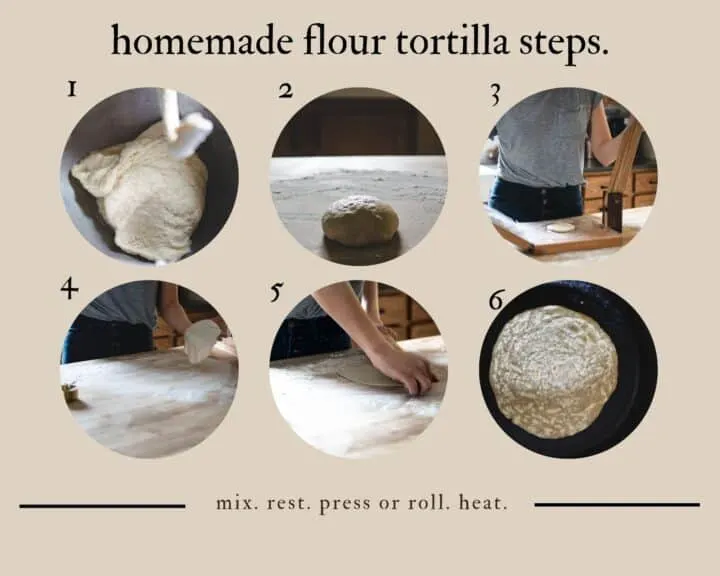
how to make flour tortillas
The recipe is the same whether you roll them out by hand, or use a press. (I love my tortilla press, and it was a gift from a dear family member. It's gorgeous and make beautiful white, blue, or yellow corn tortillas instantly. FYI, Cinco de Mayo is around the corner and I've got a corn tortilla post coming soon, so stay tuned! I've been working hard on it, and the process is different with corn tortillas than flour.) That being said, I find that with flour tortillas, while this press does get them flat and uniform, they require just a couple rolls with the rolling pin to stretch them out even thinner. They are all basic, fast and easy steps that take mere seconds.
mixing the dough
You can do this by hand in a bowl, or even more easily in a stand mixer. It will start out looking a bit shaggy, but the key is to keep mixing until a smooth ball has formed. If you find that the dough just seems a bit dry, add more water ONE TEASPOON at a time.
tortilla press vs. rolling pin for homemade flour tortillas
Once a smooth ball has formed, remove the dough and divide it into 8 equal sections. Use either a tortilla press, or a rolling pin. (I find flour tortillas work best with a rolling pin, while corn tortillas behave better in a press. I also like to form a round, flat disk and press it in the tortilla press, and then proceed to rolling with a pin.) With flour tortillas, you don't need a press though, so please feel confident in rolling the sections out by hand.


forming thin tortillas
On a floured surface, with a generously floured pin, roll from the center out. Roll from every direction to maintain an even circle. Keep rolling until you have a very thin, almost translucent sheet of circular dough, about 8 inches in diameter. It's important to keep the surface, tortilla and the rolling pin dusted with flour to avoid sticking.
cooking the tortillas
Heat a skillet to medium high heat. Do not use oil of any kind, the skillet should be dry and hot. Work with one tortilla at a time, pressing or rolling out, and then transferring to the hot skillet. It only takes about one minute per side, so don't wander away when there's a tortilla in the skillet. Stay close! Pay close attention to the state of your tortillas--they only need to come in contact with high heat for a short time. The centers will look slightly almost dewy It's alright if the centers look a little under cooked. That's just the oil coming out and they'll set up as they sit.

storing fresh tortillas
As you work with the tortillas, cooking one at a time, keep the finished stack covered, whether that's wrapped in a towel, plastic bag or foil. This will keep the tortillas fresh and soft until ready to use.
This recipe makes 8 soft taco size tortillas, or 6 burrito size tortillas. Double recipe for larger burrito size, or for more tortillas.
Are you looking for recipes for Cinco De Mayo?
Try my restaurant style (Cantina) Homemade Chips and Cabbage Salsa; it is so addicting! Or include some Spicy Mango Salsa with grilled chicken, fish or steak or on your favorite tacos!
tips for making homemade flour tortillas
- Dough will seem shaggy and dry at first, keep kneading until smooth.
- If the dough just won't come together because it seems to dry, add a teaspoon of water at a time until it does; giving the first teaspoon time to work into the dough.
- If using a press: Use a very nonstick material to press or roll the dough between; a zipper bag (gallon size) that has been cut at the seams into two squares is the best material I have found to work with.
- If using a rolling pin: keep the surface you are working on, dusted with flour to prevent sticking. Rub flour on the rolling pin periodically too, to prevent it from becoming sticky.
- If you begin to notice black dust spots on the tortillas, that is just the excess flour getting burned. Wipe the skillet out periodically, with a dry towel to keep this from showing on your tortillas.
- Keep finished tortillas covered as you go to keep them soft.
- Recipe makes 6 burrito size or 8 small taco size tortillas. Double recipe as needed.
- Store when completely cooled in an air tight container or zipper bag.
📖 Recipe

Homemade Soft Flour Tortillas (Shortening or Butter)
Ingredients
- 2 cups all purpose flour plus more for dusting and rolling
- ⅔ cup water
- ¼ cup shortening or butter
- 1 pinch salt optional
Instructions
- Heat a cast iron skillet or grill pan to medium high heat. Do not oil, keep dry.
- Combine all ingredients until dough ball is formed; keep kneading for up to 5 minutes until smooth dough ball forms.
- Turn dough out onto a floured surface and divide into 8 equal portions.
- Using one hand cupped as a guide, flatten the dough into a 3 inch flat circle. This will help to keep it circular in the next step as you roll it.
- Roll with a rolling pin from the center out, from every direction; or press between a large size tortilla press.
- One by one, cook tortilla directly on hot pan, and cook just until brown marks begin to show, about 30-60 seconds each side. They should look like they have a slight sheen, almost translucent center. They will seem underdone in the center but this is what you want as they only need to come in contact with the heat and will set in the center, yielding an extremely soft tortilla.
- Repeat with remaining tortillas, and keep finished tortillas covered with a towel or wrapped up with foil as you go to keep them soft.
- Store in a zipper bag once completely cooled.
Notes
- Dough will seem shaggy and dry at first, keep kneading until smooth.
- If the dough just won't come together because it seems to dry, add a teaspoon of water at a time until it does; giving the first teaspoon time to work into the dough.
- If using a press: Use a very nonstick material to press or roll the dough between; a zipper bag (gallon size) that has been cut at the seams into two squares is the best material I have found to work with.
- If using a rolling pin: keep the surface you are working on, dusted with flour to prevent sticking. Rub flour on the rolling pin periodically too, to prevent it from becoming sticky.
- If you begin to notice black dust spots on the tortillas, that is just the excess flour getting burned. Wipe the skillet out periodically, with a dry towel to keep this from showing on your tortillas.
- Keep finished tortillas covered as you go to keep them soft.
- Recipe makes 6 burrito size or 8 small taco size tortillas. Double recipe as needed.
- Store when completely cooled in an air tight container or zipper bag.
Angela
Friday 21st of February 2025
I think this is going to be my go to recipe. I have tried a lot and these were by far the best texture and didn’t tear when making a burrito. Next time I make them though I’ll be adding at least 1/2-1 teaspoon of salt. I added about 1/4 tsp and they had little to no flavor.
Diane
Monday 26th of September 2022
I haven’t made these yet. Just a question - why so little salt? Don’t the tortillas need salt for flavor? Does salt make the tortillas less soft? Just curious!
Angela
Friday 21st of February 2025
@Debbie, I just made these and used butter and they had a little flavor but definitely need wayyyy more salt
Debbie
Saturday 27th of April 2024
@Diane, I just made these, and I added a little more salt than called for, yet it still was not enough. I was so sad that they had no flavor. My husband said they reminded him of communion crackers… to be fair; I used shortening, not butter. Perhaps they are tastier with butter.